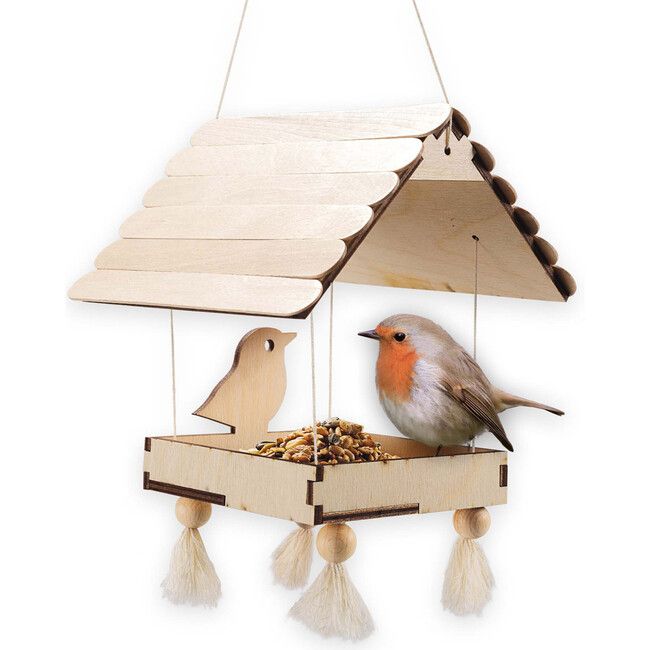
Introduction to DIY Bird Feeders
Creating a bird feeder yourself can be a rewarding project. It lets you engage with nature right in your backyard. DIY bird feeders also offer an excellent chance to learn basic woodworking skills. They can be a fun family activity too. From gathering materials to the final touches, building a bird feeder is a straightforward process. This guide will help you understand how to build a bird feeder with ease.
Bird feeders come in various designs and sizes. You can tailor them to attract specific bird species. Building your own feeder can give you control over quality. It ensures you use safe and long-lasting materials. It can also keep costs manageable, compared to buying pre-made ones. Furthermore, a homemade bird feeder can be a chic addition to your garden. It can add a touch of rustic charm or a pop of color, depending on your style preferences.
For beginners, the project can start with simple designs. You don’t need high-end tools or advanced skills. You can complete most projects with basic materials and simple tools. As you gain confidence, you can tackle more intricate designs. In this blog, we’ll guide you through the necessary materials and tools. We’ll also provide a detailed construction process, finishing touches, and maintenance tips. Let’s get started on how to build a bird feeder that will be the highlight of your garden and attract a plethora of birds.
Materials You Will Need
To start your DIY bird feeder, gather the right materials first. You will need wood as the primary material. Cedar is a good choice for its durability and natural resistance to the elements. For this project, here are the items you’ll need:
- 2 pieces of 1?6 cedar, each cut to 12 inches long.
- 2 pieces of 1?6 cedar, each 9 inches long.
- 1 piece of 1?6 cedar, 10 inches long.
- 2 pieces of 1?6 cedar, again 10 inches long but sliced lengthwise into halves measuring 2 1/8 by 10 inches each.
These pieces will form the base, sides, and roof of your bird feeder. Keep in mind, bird-friendly design ensures looking after your feathered visitors. It’s why the cedar board sizes work well.
Ensure you also have the following:
- Wood glue to bond the pieces securely.
- 1 1/4 inch wood screws for sturdy assembly.
- Rope or chain for hanging the feeder.
Optional but helpful:
- All-weather caulking can help keep moisture out, thus extending the life of your feeder and protecting the birdseed.
For a simpler list, you’ll need cedar boards, wood glue, wood screws, rope or chain, and optional caulking. With these materials, you’re all set to learn how to build a bird feeder that’s both practical and visually pleasing.
Tools Required for the Project
To build a bird feeder, you need the right tools. Don’t worry; they’re simple and easy to find. Here’s what to gather:
- A saw for cutting the wood to proper lengths. A hand saw will do, but a miter saw can make the job quicker.
- A drill with bits for making holes for the rope or chain and for screwing the pieces together.
- A screwdriver if you prefer to hand-tighten screws or if you don’t have a drill.
- Sandpaper to smooth out any rough edges on the cut wood pieces.
- A carpenter’s square ensures your feeder’s corners are perfectly angled.
- Measuring tape to accurately measure the wood before cutting.
- A pencil for marking your cuts on the wood.
- Safety goggles to protect your eyes from sawdust and debris.
- Optional: Caulking gun if you plan to weatherproof your feeder with all-weather caulking.
Remember, proper tool use is crucial. Watch videos on how to safely operate tools if you’re new to this. With care, you can build a quality bird feeder and learn how to handle tools confidently.
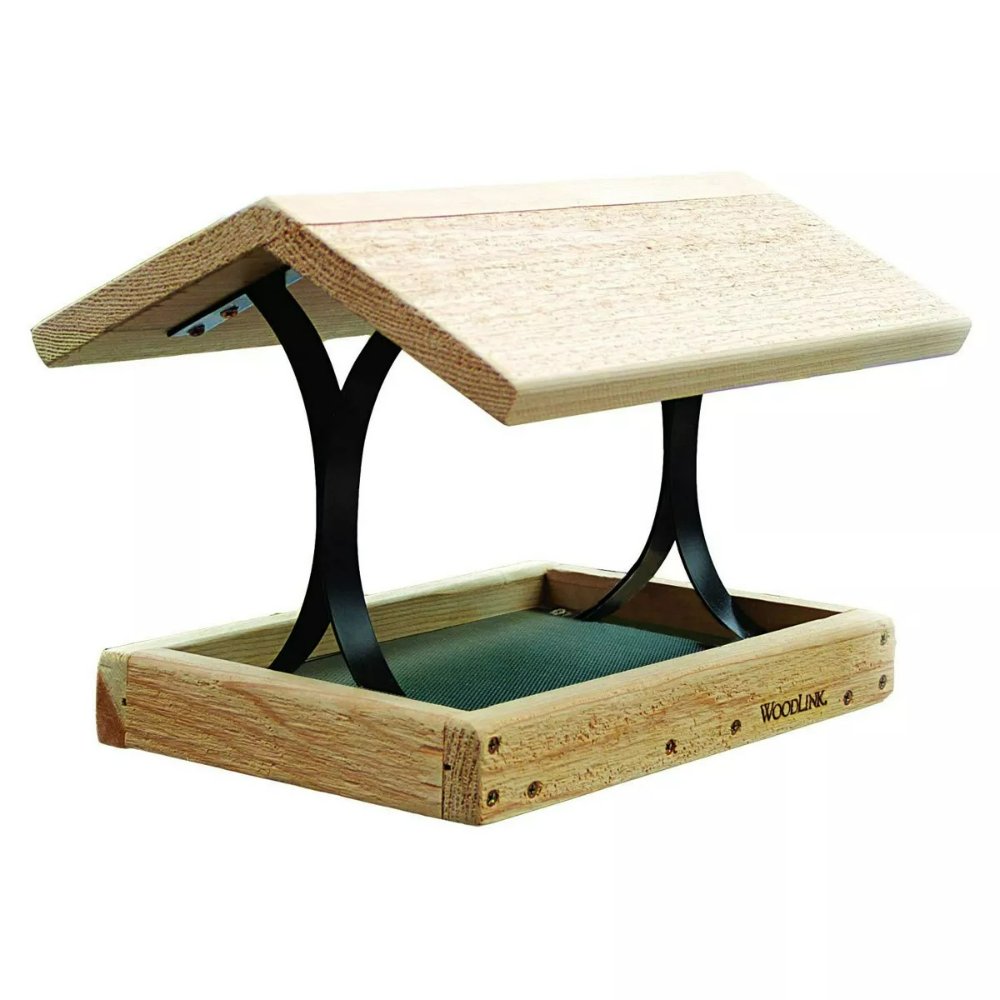
Step-by-Step Construction Process
To build your DIY bird feeder, follow these steps carefully:
- Start with the 12-inch cedar boards for the base of the feeder.
- Take the 9-inch boards and find the center.
- Cut a 45 degree angle from the center outwards to create a peak.
- Drill holes on the top of both 9-inch boards for the rope.
- Attach side pieces to the base using wood glue and screws.
- Secure the 10-inch ‘lip’ pieces between sides at base edge.
- Align the first roof board and attach it, allowing slight overhang.
- Optional: Apply all-weather caulking inside the roof line.
- Place the second roof board to overlap the first and the peak.
- Drill small holes in the feeder base for water drainage.
- Thread the rope through drilled holes and knot inside.
- Optional: Sand the feeder for a smooth finish.
- Hang the feeder with premium bird seed and enjoy.
Each step should get executed with attention. Ensure boards align correctly. Tighten screws firmly for stability. The caulking step is optional but recommended for added protection. Drill drainage holes carefully to avoid bird seed loss. Choose a suitable rope length for hanging. This simple process leads to a delightful garden addition.
Adding the Finishing Touches
After assembling your DIY bird feeder as detailed in the previous steps, now’s the time to add the finishing touches that not only improve its functionality but also its visual appeal. Here’s what to focus on:
- Sanding: Smooth the edges of all cut wood pieces using sandpaper. This will prevent any splinters and give your feeder a polished look.
- Staining or Painting: Applying a coat of stain or paint enhances the durability and appearance of your bird feeder. Choose a non-toxic product, to ensure it’s safe for birds. This step is optional but could extend the life of the feeder and make it more attractive.
- Decorating: Remember functionality, but feel free to add decorative elements. Consider things like carvings, small figurines, or even colorful beads. Ensure decorations don’t obstruct the birdseed or perching areas.
- Checking for Stability: Before you hang the feeder, ensure all screws are tightened and the structure feels stable. This ensures the birds’ safety and the feeder’s longevity.
These finishing touches will not only make your bird feeder stand out but also ensure it serves its purpose well throughout.
Tips for Weatherproofing Your Bird Feeder
To ensure your DIY bird feeder withstands the elements, consider these weatherproofing tips:
- Choose Durable Wood: Cedar is an excellent choice as it naturally resists decay and repels insects.
- Apply All-Weather Caulking: Run a bead of caulking along interior roof seams to prevent water seepage.
- Drill Drainage Holes: These allow any trapped water to exit, stopping mold growth and seed spoilage.
- Sand and Seal: Smooth out rough areas with sandpaper, then seal with a clear, bird-safe preservative.
- Overhang the Roof: Extend the roof beyond the feeder’s base to shelter the seed from rain.
- Consider a Weather Guard: A plastic or metal dome above the feeder can deter rain and snow.
By following these simple steps, you create a safe haven for birds in all weather conditions.
Mounting and Placement Suggestions
Once you’ve built your bird feeder following the construction steps above, it’s time to find the perfect spot to mount it. Placement is as vital as the build itself for attracting birds. Here are some suggestions on where to place your DIY bird feeder:
- Visibility: Choose a location where the feeder is easily visible to birds flying by. An open space near bushes or trees is ideal.
- Safety: Mount the feeder away from predator access. Cats and other animals should not easily reach it.
- Height: Keep the feeder at a height that discourages pests. About five to six feet off the ground is typically good.
- Stability: Ensure the mounting spot is stable. The feeder should not sway too much in the wind.
- Nearby Shelter: Place it within a short flight to cover like shrubs or trees. Birds like quick escape routes.
- Away from Windows: To prevent bird collisions, place feeders at least three feet away from windows.
- Easy Access for Refilling: Be sure you can easily reach the feeder to add seeds and perform cleaning.
Identifying the best location requires observation. Watch how birds move in your yard and select a spot that complements their natural behaviors. It’s not just about how to build a bird feeder, but also about integrating it into your outdoor space effectively to enjoy the flurry of feathers year-round.
Maintenance and Cleaning Tips
Proper maintenance ensures your DIY bird feeder lasts long and stays welcoming for birds. Here’s how to keep it in top shape:
- Regular Cleaning: Empty and clean the feeder every two weeks. Use mild soap and water, and rinse well.
- Check for Damage: Inspect the feeder during cleaning for any signs of wear. Look for loose screws and cracked wood.
- Keep it Dry: Ensure seeds stay dry to prevent mold. If seeds get wet, clean the feeder thoroughly.
- Refill with Fresh Seed: Always refill with fresh seeds. Stale seeds don’t attract birds and may harbor bacteria.
- Prevent Squirrel Damage: Apply a coat of non-toxic repellent on the feeder to dissuade squirrels.
- Watch for Insects: Clean out any bugs found in the feeder. Insects can deter birds from visiting.
- Store Seed Properly: Keep extra seed in a cool, dry place. A sealed container is best to prevent bugs.
- Seasonal Adjustments: In winter, clean out snow and ice. In rainy seasons, check for water accumulation.
By following these simple cleaning and maintenance tips, your bird feeder should remain a safe and inviting stop for birds year-round. Incorporating these practices into your routine will ensure the longevity of your creation and a thriving spot for birds to visit.