Introduction to Milk Carton Bird Feeders
Creating a milk carton bird feeder is a fun, eco-friendly project. It’s a perfect way to re-use household waste and provide for our feathered friends. Not only do these feeders support local wildlife, but they also give a second life to milk cartons that might otherwise end up in landfills. In the colder months, they are especially helpful for birds seeking extra nourishment.
A milk carton bird feeder is easy to make with simple tools and materials. With a few creative tweaks, you can transform an ordinary milk container into a cozy dining spot for birds. It’s an activity that combines crafting with nature, suitable for all ages. In this guide, we will walk through the necessary materials, the construction process, and some decoration tips to personalize your bird feeder.
Materials Needed for Your DIY Feeder
To start your milk carton bird feeder project, gather the following items:
- An empty milk carton, cleaned and dried.
- Non-toxic paint or waterproof enamel paints for decoration.
- A craft knife or scissors to cut the carton.
- A sturdy string or twine for hanging the feeder.
- Small sticks or wooden skewers to create perches.
- Glue or a hot glue gun for assembling parts.
- Optional decorative materials, such as googly eyes or washi tape.
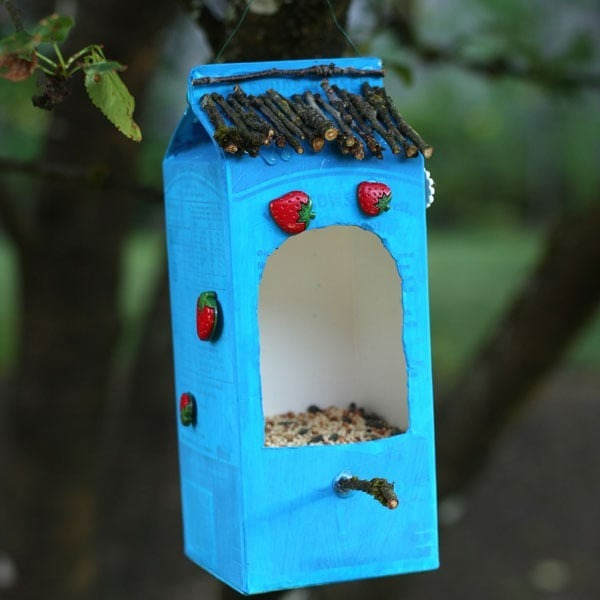
Using these materials, you’ll transform an old milk carton into a charming bird feeder. Be sure to choose paints that withstand weather conditions if you decide to get creative with decoration. Waterproof enamel paints come recommended for their durability. But if using acrylic paints, consider applying a waterproof varnish to protect your artwork.
Always prioritize safety when using sharp tools. Ensure you handle the craft knife or scissors with care to avoid accidents. Using a glue gun may also require caution to prevent burns. Once you have these materials and tools ready, you’re set to create a bird feeder that birds will love and that will add a touch of whimsy to your garden or balcony.
Preparing Your Milk Carton for Upcycling
To start, choose a clean milk carton. Make sure it’s empty and wash it well. Let the carton dry completely before you begin any crafting. This is crucial to ensure the paints and glue stick properly.
Next, remove any labels or glue residue. These can affect the texture of your feeder. Warm, soapy water often works to get rid of stubborn bits. If necessary, use a gentle scrubber.
Check the carton for any damage. Small holes or tears can make the feeder less sturdy. If you find any, you might want to pick a different carton for your project.
Once your milk carton is clean and intact, think about your design. Planning ahead saves time. Decide on colors and where each element will go. This will guide you in the next steps of construction.
Your milk carton bird feeder is starting to take shape. With the carton prepared, you’re ready to begin the transformation. Stay tuned for Step-by-Step Construction of the Bird Feeder.
Step-by-Step Construction of the Bird Feeder
Ready to roll up your sleeves? It’s time to create your milk carton bird feeder. Just follow these easy steps, and you’ll have a bird paradise in no time.
Step 1: Paint the Milk Carton
Pick vibrant colors for high visibility or earth tones for a natural look. Apply two coats of enamel paint for a weather-resistant finish. Ensure each layer dries thoroughly before proceeding.
Step 2: Cut the Feeder Openings
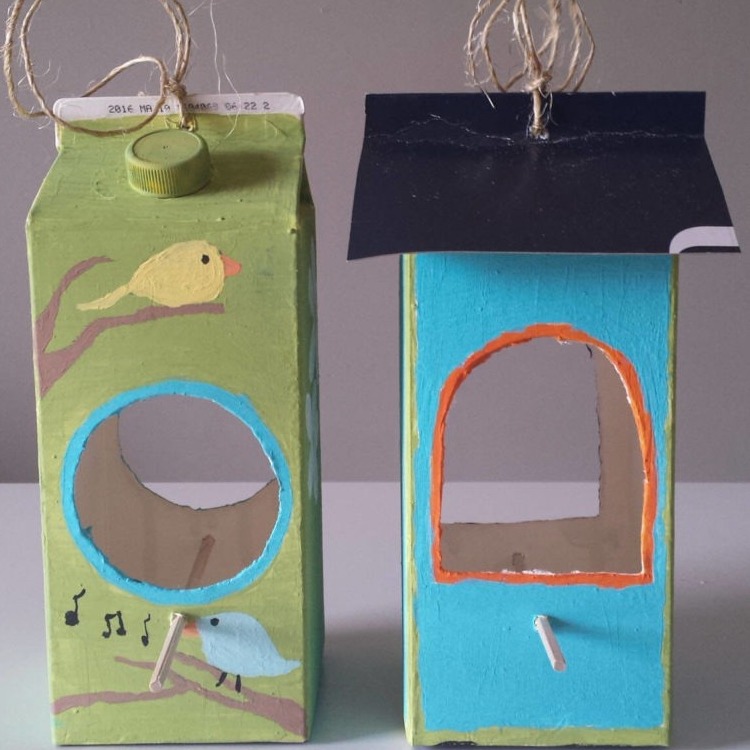
Use a craft knife to carve out entry points for the birds. Sketch a rounded rectangle on each side of the carton, then cut along the lines. Keep the lower edge high enough to hold seeds.
Step 3: Create Perches
Take small sticks or skewers and poke them through the carton sides. These will be perches for visiting birds. Secure them with glue if necessary.
Step 4: Decorate Your Feeder
Unleash your artistic side! Glue on googly eyes or use washi tape for fun patterns. Let your imagination fly.
Step 5: Attach the String for Hanging
Pierce holes at the top of the carton. Thread a strong string through for hanging. Double-knot the ends.
Step 6: Fill Up with Birdseed
Pour a generous amount of seeds into the bottom of the carton. Now, your feeder is ready for its feathered guests.
Take a moment to admire your handiwork. With these steps, you turned a simple carton into a bird feeder. Not only is this feeder eco-friendly, it’s also a joy for both you and the local birds.
Cutting and Decorating Techniques for Personalization
Transforming a milk carton into a bird feeder offers a chance to tap into creativity. Let’s explore how to cut and decorate your feeder for a personal touch.
Cutting the Feeder Openings
Mark the sides where birds will enter. Use a rounded rectangle shape for ease. Cut these out with a craft knife or scissors. Be sure cuts are smooth to keep birds safe.
Creating a Unique Design
Imagine a theme or pattern for your feeder. Paint with enamel for lasting color. Add a coat of varnish if using acrylic paint. This will extend the life of your design.
Adding Decorative Elements
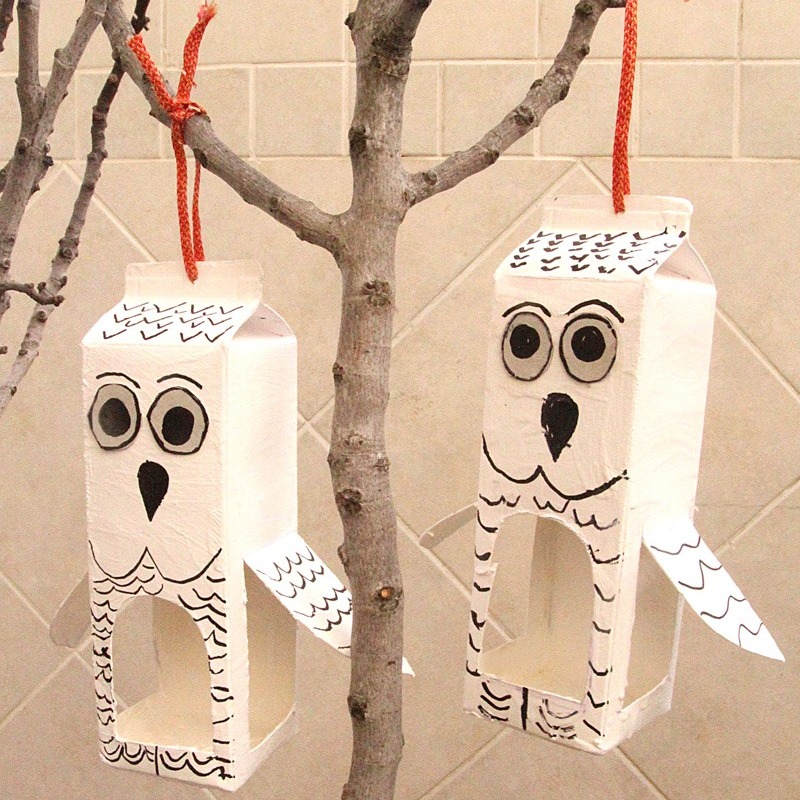
Give your milk carton character with embellishments. Glue on googly eyes or bottle caps for an ‘owl’ effect. Use washi tape for a playful pattern around the openings. Stick on colorful shapes or stickers for extra flair.
Personalizing with Perches
Perches are important for birds to rest. Use sticks or skewers for nature’s touch. Paint them or wrap with yarn for a pop of color. Attach securely with glue on the inside of the carton.
Through these steps, your milk carton bird feeder will not only be functional but also display a unique style. It delights birds and adds charm to any outdoor space. Get creative and personalize your bird feeder to stand out in your garden!
Safety Tips for Milk Carton Feeders
Creating a milk carton bird feeder is both a fun and responsible activity. But safety is key, both for you during the crafting process and for the feathered friends visiting your feeder. Here are some essential safety tips to bear in mind:
Choose Safe Materials
Select non-toxic, weather-resistant paints for decorating. If kids are helping, ensure all materials are child-friendly.
Be Careful with Tools
When cutting the carton, use a craft knife with caution. Keep your fingers clear of the blade. Supervision is crucial if children are involved.
Smooth Edges
After cutting openings, check for sharp edges. Smooth out any with sandpaper. This prevents harm to birds.
Secure Glueing
Ensure all glued parts are firmly attached before hanging. This avoids parts falling off and possibly injuring wildlife or people.
Sturdy Hanging
Make sure the string or twine used for hanging is strong. It should hold the feeder even with added birdseed and during windy conditions.
Regular Checks
Inspect your feeder often. Look for wear and tear and make repairs as necessary.
By keeping these tips in mind, you will create a safe and welcoming dining spot for birds and enjoy a successful milk carton bird feeder project.
Hanging and Placing Your Bird Feeder Outdoors
Once your milk carton bird feeder is complete, it’s time to find the perfect spot outdoors. Here’s how you can hang and place your bird feeder for maximum bird visits and enjoyment.
Choose a Safe Location
Pick a spot away from predators like cats or larger birds that might scare away the small ones. High branches or a sturdy hook on a wall are ideal spots.
Avoid High Traffic Areas
Place your feeder in a quiet area. Too much movement or noise can deter birds from visiting.
Keep It at Eye Level
Hang the feeder at a height where it’s easy for you to refill and for children to see without using any tools.
Nearby Shelter
Birds like quick access to cover. Try to hang your feeder near bushes or trees where they can retreat if they feel threatened.
Visibility
Ensure your feeder is in a visible location for birds to spot. Clear views from the sky can attract more feathered friends.
Stable Hanging
Make sure the feeder hangs securely. This means it should not swing or spin with the wind.
Refill and Clean Regularly
Keep the bird seed levels sufficient. Clean the feeder every few weeks to prevent mold and bacteria.
By following these steps, you’ll ensure that your milk carton bird feeder is not only a haven for birds but also a safe and delightful addition to your outdoor space. Enjoy watching the variety of birds that will come to visit, and take pride in your eco-friendly DIY craft.
Maintenance and Upkeep of Your Milk Carton Bird Feeder
Maintaining your milk carton bird feeder is key to its longevity and the health of visiting birds. Here are some simple tips to help you keep your DIY feeder in top condition:
- Inspect Regularly: Check your feeder each week for damage or wear. Look for holes, cracks, or loose parts that need fixing.
- Clean Periodically: Wash the feeder every two weeks with warm, soapy water. Rinse well and let it dry before refilling with birdseed.
- Refresh Birdseed: Change the seeds often to avoid mold and spoilage. Wet or old seed can be harmful to birds.
- Monitor Squirrel Activity: Squirrels may try to access the feeder. If they cause damage, consider squirrel-proofing methods or moving the feeder.
- Secure the Hanging Spot: Make sure the string or wire is still strong and not fraying. Replace it if it shows signs of weakness.
- Seasonal Considerations: In colder months, ensure the feeder is clear of snow. In hot weather, offer birds fresh water nearby.
By following these steps, your milk carton bird feeder will remain a safe and inviting place. Birds will continue to enjoy the food you’ve provided, and you’ll enjoy the beauty and activity they bring to your garden.
